Managing Log Settings
This task can be performed in the global administration view only.
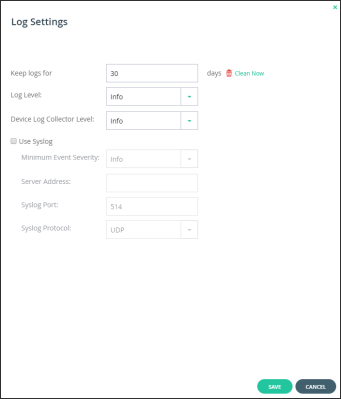
You can configure CTERA Portal log settings.
To configure log settings:
1 In the global administration view, select Settings in the navigation pane.
2 Select Logs, under NOTIFICATIONS AND LOGS in the Control Panel content page.
The Log Settings window is displayed.

3 Complete the fields.
Keep logs for – The number of days that the CTERA Portal should store logs. The default value is 30 days.
Log Level – The minimum log level to display in the CTERA Portal. For example, if you select Critical, then only Emergency, Alert, and Critical logs entries are displayed in the CTERA Portal log pages. The default value is Info.
Device Log Collector Level – The minimum log level to collect from each device. For example, if you select Critical, then only Emergency, Alert, and Critical log events are collected from devices. The default value is Info.
4 Check Use Syslog if you want to configure the CTERA Portal to send logs to a Syslog server located on your network or in the cloud.
Note: You can obtain free Syslog servers online, such as Kiwi Syslog Daemon (http://www.kiwisyslog.com/).
Minimum Event Severity – The minimum log level to send to the Syslog server. For example, if you select Critical, then only Emergency, Alert, and Critical log events are sent to the Syslog server. The default value is Info.
Server Address – The Syslog server IP address.
Syslog Port – The Syslog server's port number. The default value is 514.
Syslog Protocol – The protocol to use to send logs. The default is UDP.
Note: To send logs securely over TLS the portal image must be 6.1.1059 or higher.
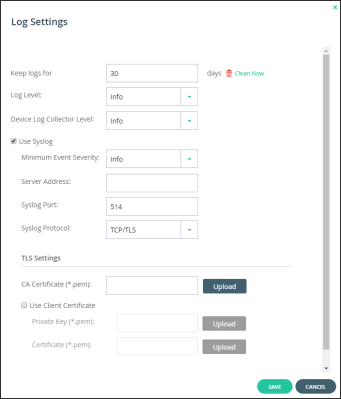
To send logs securely using TLS:
a Change the Syslog Protocol to TCP/TLS.

b Click Upload for CA Certificate (*.pem) and browse to your valid CA certificate, select it and click Open. The certificate must be in PEM format. If the certificate is valid, CA Certificate (*.pem) displays the certificate distinguished name.
c Optionally, check Use Client Certificate if you want authentication on both the client and server sides. If client side authentication is enabled:
i Click Upload for Private Key (*.pem), browse to your private key, select it and click Open. The private key must be in PEM format.
ii Click Upload for Certificate (*.pem) and browse to your valid certificate, select it and click Open. The certificate must be in PEM format.
If the private key is valid, Valid is displayed for Private Key (*.pem). If the certificate is valid, Certificate (*.pem) displays the certificate distinguished name.
5 Click SAVE.