Configuring Message Settings
You can configure global messaging settings that will be inherited by all servers. For information on overriding these settings on a per-server basis, see Editing Server Settings.
This task can be performed in the global administration view only.
To configure messaging settings:
1 In the global administration view, select Settings in the navigation pane.
2 Select Messaging Settings under NOTIFICATIONS AND LOGS in the Control Panel page.
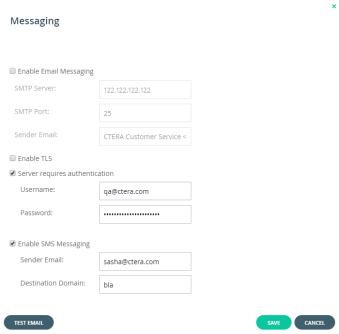
The Messaging window is displayed.

3 Complete the fields.
Enable Email Messaging – Enable sending email messages from the CTERA Portal to users. The SMTP Server, SMTP Port, and Sender Email fields are enabled.
SMTP Server – The outgoing mail server address for sending email messages from the CTERA Portal to users.
SMTP Port – The port number for sending email messages from the CTERA Portal to users.
Sender Email – The email address to use in the From field of notifications sent to global administrators by the global portal.
For example: "CTERA Customer Service <support@ctera.com>".
Enable TLS – Use Transport Layer Security (TLS) encryption for sending email messages from the CTERA Portal to users.
Server requires authentication – The SMTP server requires authentication. The Username and Password fields are enabled.
Username – The user name that the CTERA Portal uses when authenticating to the SMTP server.
Password – The password that the CTERA Portal uses when authenticating to the SMTP server.
Enable SMS Messaging – Enable sending passcodes via text message to protect access to guest invitations. To effectively enable SMS messaging, you must register with an SMS gateway and then enter the sender email and destination domain in the fields below.
SMS messaging must be enabled here in order for the SMS option to be displayed among the authentication options in the Collaboration section of the Settings > Virtual Portal Settings page.
Sender Email – The sender email address registered with the SMS gateway.
Destination Domain – The DNS suffix of the sender email.
4 Click SAVE.
5 To validate SMTP mail server settings, click Test Email to send a test email. Verify that you receive the test mail at the email address defined in your administrator user account.
6 If you changed the SMTP settings, restart the portal servers in order for the changes to take effect.