Changing the Backup Files Selection
1 In the Configuration tab, select Backup Options > Backup Files.
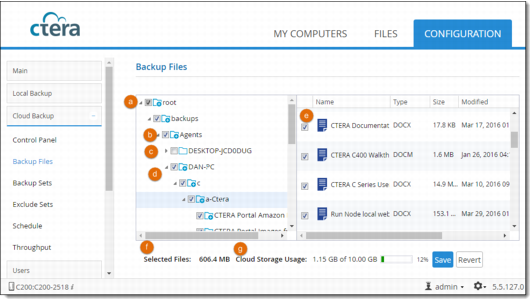
The Backup Files window opens, displaying all files selected for backup:
2 Perform the following steps to change the selection of files to back up:
a Expand the tree ("root") and navigate to any volumes, folders or files you want to add or remove from the backup:
b Select the check box next to any item you want to add to your backup.
c Deselect the check box next to any item you want to remove from your backup.
As you go through the list, the Backup Files window displays the following:
d Shares and folders appear in the tree.
e Files in each folder appear in the right pane when you select the folder.
f The Selected Files field indicates the size of the files selected for backup.
g The Cloud Storage Usage field indicates the amount of used space in your account after the next cloud backup operation (including backups from any other CTERA devices included in your account).
For example, let's say your account includes two devices, and each device will back up 100 MB worth of files in the next cloud backup operation, for a total of 200 MB. Your account already has 350 MB worth of files stored online. In this case, the Cloud Storage Usage field will display "550MB".
3 Click Save.
Note: 
indicates that files in this folder are selected for backup and new files and folders in this folder will be backed up.
A check box with a white background (

) indicates that the folder and all of its sub-folders are selected for backup.
A check box with a gray background (

) indicates that some (but not all) of the folder’s sub-folders are selected for backup.
An empty check box indicates that the folder and all of its sub-folders will not be backed up.