Configuring Global File-Level Backup Settings
1 In the Configuration tab, select Local Backup > CTERA Agents.
The CTERA Agents page is displayed.
2 Click Global Settings, and then select the File-level Backup tab.
Change the settings as needed.
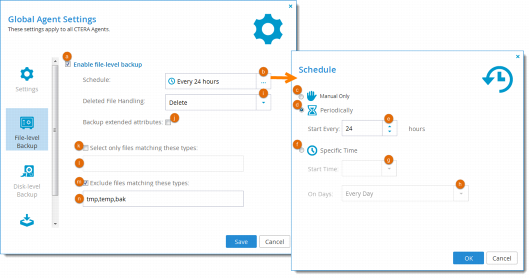
a Check the box to enable file-level backup.
b Click

to set a schedule, use controls labeled
c-
h as necessary, and click
OK when you're done. The default file-level backup schedule is
Every 24 hours.
c Select to disable automatic backups.
d Select to specify that automatic backups should be performed every x number of hours.
e Specify the interval between backups, in hours.
f Select to specify that automatic backups should be performed at a certain hour on certain days.
g Select the hour at which backups should start.
h Specify on which days backups should occur.
i Deleted File Handling. Select one of the following to specify how deleted files should be handled:
• Keep Deleted Files. Files deleted in the source folder should be kept and not deleted in the destination folder.
For example, if one of the files in the folder is deleted on the CTERA Agent-enabled computer, the file will not be deleted from the cloud storage gateway network share.
• Move to Trash Can. Files deleted in the source folder should be moved from the destination folder to the Recycle Bin, which is a special folder named “.Trash”.
• Delete (default). Files deleted in the source folder should be permanently deleted from the destination folder.
j Backup extended attributes. Select this option to back up special file permissions and metadata. This is supported only if the target volume is of the XFS/EXT3/NEXT3 type.
k Select only files matching these types. To specify that only files of certain types should be included in local backup operations, select this option, and then type the relevant file extensions in the field provided.
The file extensions must be separated by commas. For example: doc,docx,docm,dotx,dotm
l Exclude files matching these types. To specify that files of certain types should be excluded from local backup operations, select this option, and then type the relevant file extensions in the field provided.
The file extensions must be separated by commas. For example: tmp,temp,bak
3 Click Save to save your changes.


 to set a schedule, use controls labeled c-h as necessary, and click OK when you're done. The default file-level backup schedule is Every 24 hours.