Managing the Portal from a Restricted Shell
You can restrict what can be done on the portal instance from within an SSH session. The following operations are provided when the restricted shell is configured:
Note: A restricted shell is automatically configured for a portal running in an AWS environment.
To configure the restricted shell:
Note: This procedure is not required for a portal running in an AWS environment.
1 Create a private SSH key (.ppk) for the admin user.
2 Open a SSH session to the CTERA Portal instance and log in as the root user.
3 Run the following command to enable SSH key access to the portal: ctera-enable-appliance-mode.sh sshkey
where sshkey is the SSH key created in step 1.
Note: In a separate SSH session, verify that you can log in to the portal as the admin user.
4 Run the following command to enable the restricted shell: ctera-set-root-access.sh DISABLE
Note: In a separate SSH session, verify that you cannot log in to the portal as the root user.
When the portal is configured with multiple servers, for high availability, you need the SSH Key when accessing any of the servers.
Logging In to the Restricted Shell
Open a SSH session to the CTERA Portal instance and log in with the admin user.
Getting Help
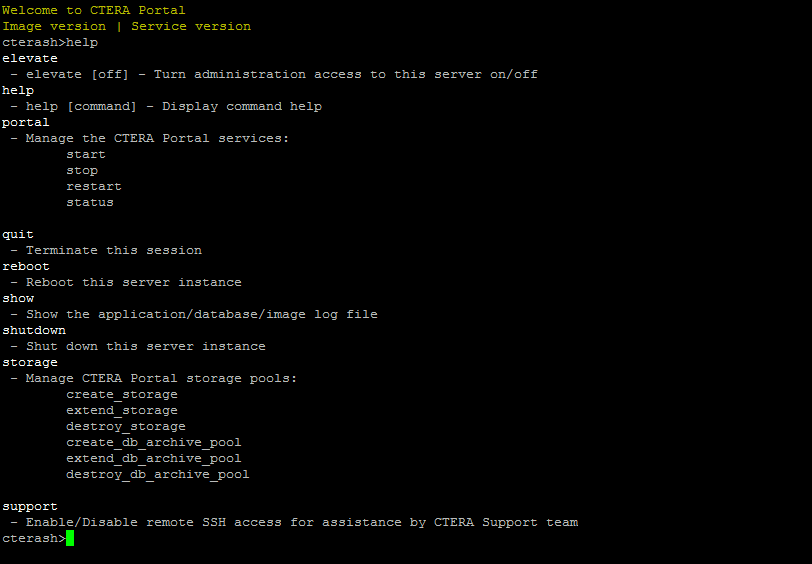
Type Help to display the available commands.

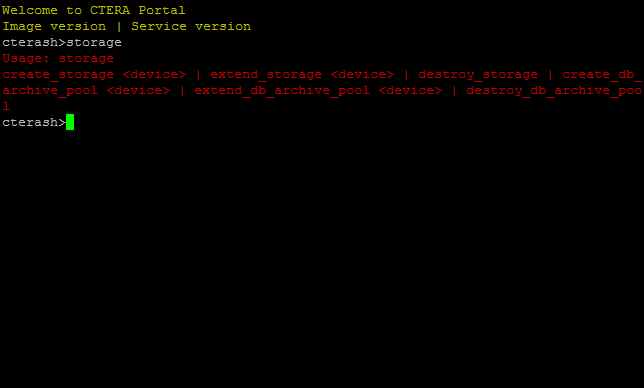
To get help for commands that require an argument, enter the command. For example, typing storage displays the syntax for the storage command.

Note: Entering a command that does not require an argument, immediately executes that command.
CTERA Portal Restricted Shell Commands
The following shell commands are available:
elevate – The user has root access. A string is returned which is entered in the machine to elevate to enable the user to perform additional actions as a sudo user. Root access is granted for 24 hours, after which time the root session automatically ends.
elevate off – The root session ends.
help – Display details of the available shell commands.
portal – Perform a specific option on the portal. The options are:
start – Start the portal service.
stop – Stop the portal service.
restart – Restart
the portal service.
status – Display the portal status, including the status of the database and Tomcat services, the portal status and the percentage of storage used.
quit – End the shell session.
show – Show the specified log file. The options are:
db-log – Display the database log.
application-log – Display the application log.
image-log – Display the CTERA portal log.
Quit the display by entering Ctrl-C.
shutdown – Shutdown the virtual machine running the CTERA Portal.
storage – Options to manage portal storage. The options are:
create_storage <device> – Add a volume to the CTERA portal, to create a data pool.
extend_storage <device> – Add a volume to the CTERA portal data pool.
destroy_storage <device> – Remove a volume from the CTERA portal data pool.
create_db_archive_pool <device> – Create a copy of the CTERA portal data pool, to use for disaster recovery.
extend_db_archive_pool <device> – Add a volume to the archive CTERA portal data pool, used for disaster recovery.
destroy_db_archive_pool <device> – Remove a volume from the archive CTERA portal data pool, used for disaster recovery.
support – For use with CTERA support to enable remote access by support personnel to help resolve problems. The options are:
enable – Enable remote access by CTERA support.
disable – Disable remote access by CTERA support.
Note: For portal management tasks that require root access, first run elevate