Using PostgreSQL Streaming Replication
Streaming replication enables the continuous streaming and replication of WAL segments from the WAL directory and archived WAL segments from a primary server (either the CTERA master database server, or a catalog node) to a secondary database server.
The following diagram illustrates streaming replication with continuous archiving and point-in-time recovery:
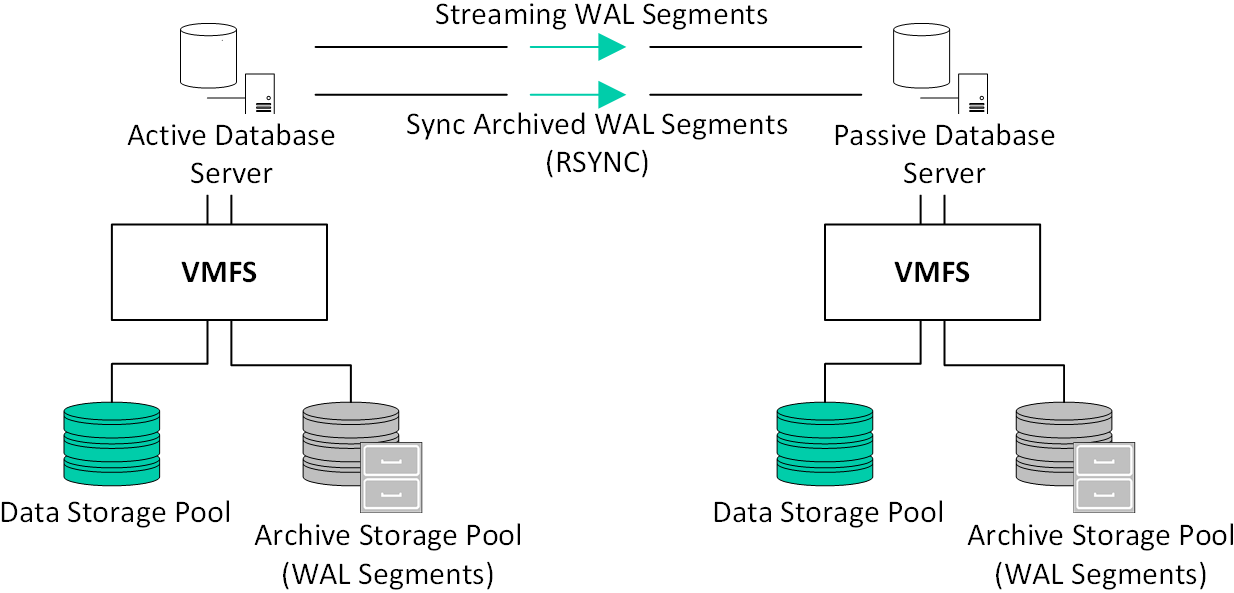
Note: Syncing archived WAL segments is done only on the first setup of the replica.
This process is complementary to configuring continuous archiving, described in Using PostgreSQL Continuous Archiving. It protects against failures occurring on the primary database server, by streaming the WAL directory and synchronizing the database's archived WAL logs to a secondary database server.
You can also configure the replication so that the archive storage pool is on the passive, slave, database and not the active database server with point-in-time recovery on the slave.
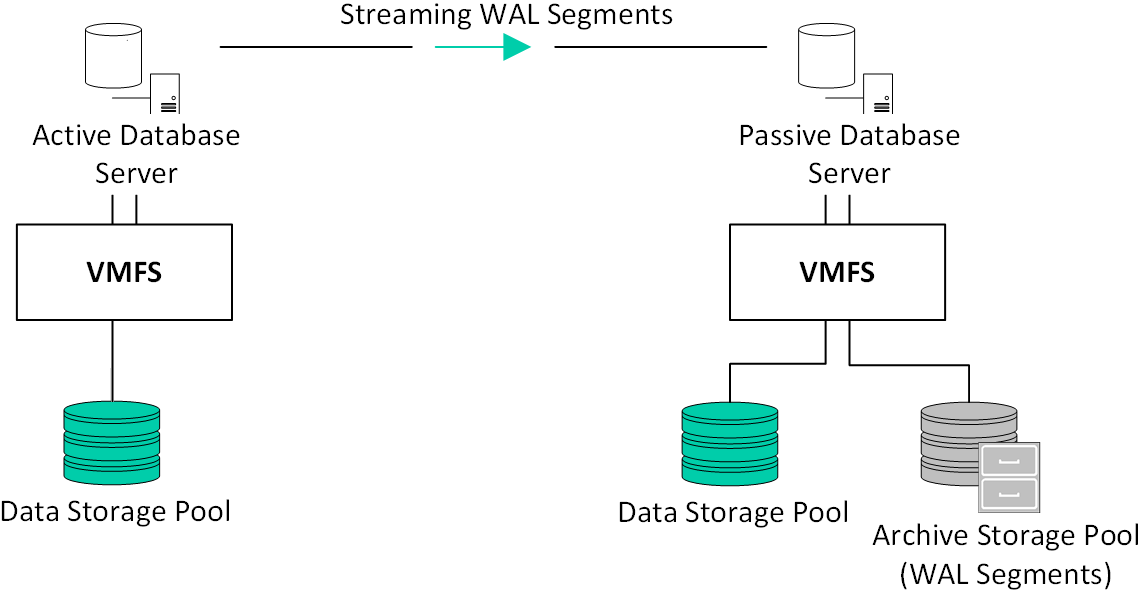
Configuring PostgreSQL Streaming Replication
The secondary server continuously streams the master server’s WAL segments, and synchronizes the master’s archived WAL segments every 10 minutes. Streaming replication traffic runs on TCP port 5432, which means you must open these ports for communication between the master and secondary database servers. The secondary CTERA database server acts as a standby/passive server and cannot be used for load balancing purposes.
Before setting up streaming replication, the following conditions must be met:
Note: The locations of the streaming and archived WAL segments are $pgdatadir/pg_wal and $DBarchive respectively.
To configure streaming replication:
1 Using SSH, log in as root to your CTERA Portal server.
2 In the command line, enter the following command to create the database archive pool:
ctera-storage-util.sh create_db_archive_pool device
Where device is the name of the disk on which the database archive pool should be created. For example: ctera-storage-util.sh create_db_archive_pool sdd
Note: This command creates both a logical volume and an LVM volume group using the specified device. Multiple devices can be specified. For example:
ctera-storage-util.sh create_db_archive_pool sdd sde sdf
The logical volume size can be extended at a later time, if needed. See Extending the Database Archive Pool.
Note: When using NFS storage, use the following command to create the database archive pool: ctera-storage-util.sh create_db_archive_pool -nfs <NFS_IP>:/export/db_archive_dir
where NFS_IP is the IP address of the NFS mount point.
3 Do one of the following:
The Setup wizard opens, displaying the Select Server operation mode window.
4 Set the server as a replication of the desired database server.
You can choose to replicate either the main CTERA database server or a CTERA catalog node.
Note: After completing the setup wizard on an already initialized server, a new server entry is created representing the newly configured server. This makes the old server entry obsolete. You can remove the obsolete server entry by doing the following:
i Log in to the CTERA Portal as a global administrator.
ii In Main > Servers locate the obsolete server entry, displayed as Not Connected.
iii Select the server and click Delete.
To configure streaming replication only on the slave server:
1 Set up streaming replication, as described above in To configure streaming replication:.
2 Using SSH, log in as root to your Master server.
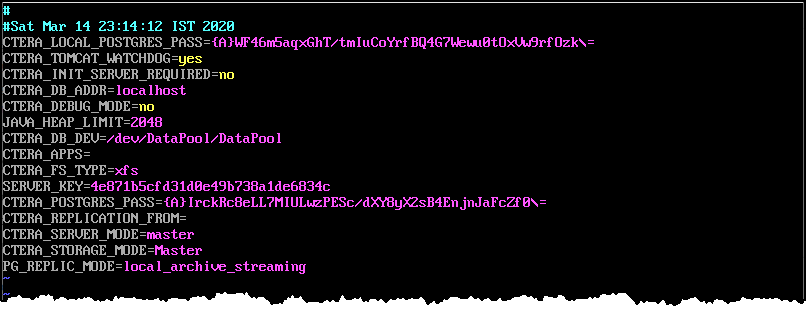
3 Disable archiving on the Master server by editing the PG_REPLIC_MODE field in portal.cfg file as follows:
Change PG_REPLIC_MODE=local_archive_streaming to PG_REPLIC_MODE=streaming
Before:
After:
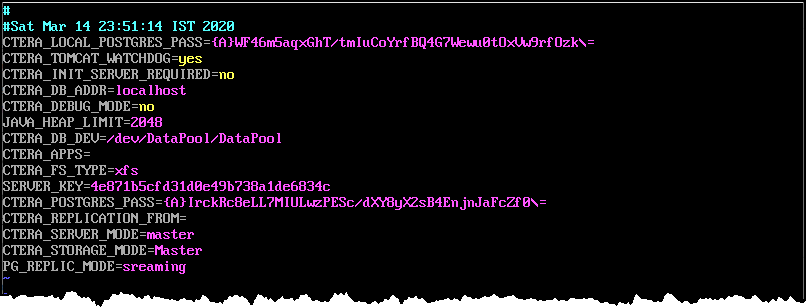
Note: You do not need to restart the master server. However, if users or any tomcat process tries to create a base backup, a warning is issued in the image log. You can ignore this warning.
4 Using SSH, log in as root to your Slave server.
5 Enable archiving on the Slave server by editing the portal.cfg file on the Slave server, as follows:
Insert the field SLAVE_ARCHIVE_FORCE=yes
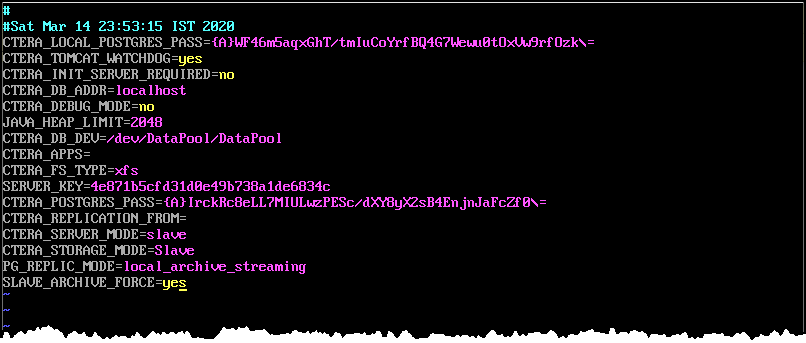
6 Restart the server by running the following command: ctera.sh restart
Note: If SLAVE_ARCHIVE_FORCE=no, the Slave server archive mode is the same as the Master server mode.
Changing the SLAVE_ARCHIVE_FORCE value always requires restarting the server.
Failing Over PostgreSQL Streaming Replication to the Secondary Database Server
The secondary database acts as a passive database, meaning it can only process read requests. In the event that the primary database fails, you have to fail over to the secondary database server, making it active, in order to assure proper continuity of the platform.
Note: You can also switch between the primary and secondary database servers, making the secondary database server the master and the primary database server a slave, when the primary database server is still up.
To switch between the master and the slave:
1 Using SSH, log in as root to secondary database server.
2 In the command line, enter the following command: ctera-failover.sh become_master
The primary database server becomes the slave, and the secondary database server becomes the master.
To failback to the master database server, when the primary database server becomes online:
1 Once the former primary database is running again, using SSH, log in as root to the original secondary database server.
2 In the command line, enter the following command: ctera-failover.sh become_replica
Log in to the portal as a global administrator and In the global administration view, select Main > Servers in the navigation pane and click the replication server name. Click DB Replication in the server window that is displayed and under Database Replication verify that the Status value is set to OK.
Note: If there is a mismatch between the requested WAL files and their location on the server the Status value can be set to Failed until the mismatch is resolved when the WAL file position reaches the location, which can take a few hours. CTERA recommends the following manual procedure to resolve this issue:
i Log in to the portal as a global administrator and In the global administration view, select Main > Servers in the navigation pane.
The SERVERS page is displayed, listing all the servers for the CTERA Portal.
ii Click the replication server name and in the server window that is displayed, under General Settings, uncheck Replication of.
iii Click SAVE.
iv Click the replication server name again and in the server window that is displayed, under General Settings, recheck Replication of.
v Click SAVE.
The replication process will reinitialize which can be monitored by clicking DB Replication in the server window and under Database Replication verify that the Status value is set to Reinitializing. After the replication has reinitialized, which can take some time, depending on the portal size and the amount of data to be replicated, and the Status value is set to OK.