Enabling File Sharing in Windows 7
If your Windows 7 computer does not appear in the Clientless Backup page, or is displayed as a grayed icon, perform the following steps to enable file sharing.
To enable file sharing in Windows 7:
1 Open the Network and Sharing Center by clicking Start > Control Panel, clicking Network and Internet, and then clicking Network and Sharing Center.
2 In the left pane, click Change advanced sharing settings.
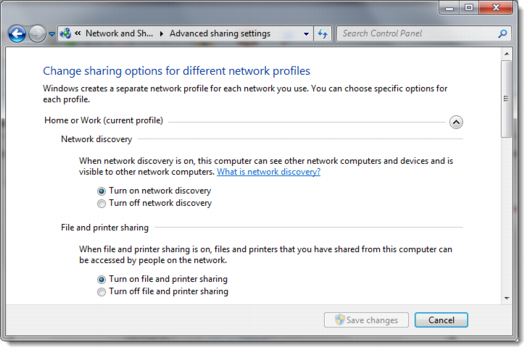
3 Expand your current network profile, by clicking the arrow to the right of its name.
The current network profile is marked "(current profile)" and is usually called "Home or Work".
4 If network discovery is off, click Turn on network discovery.
5 If file and printer sharing is off, click Turn on file and printer sharing.
6 Click Save changes.
If you are still having trouble, make sure Windows Firewall is not blocking File and Printer Sharing. Do the following:
1 Open Windows Firewall by clicking the Start > Control Panel, clicking System and Security, and then clicking Allow a program through Windows Firewall.
2 In the Allowed programs and features list, locate File and Printer Sharing, and make sure that the check boxes in the Name column and the in column for your current network profile (usually "Home or Work") are both selected.
3 Click OK.

