Clientless Backup
Note: Clientless backup is not supported on HC400E, HC400, HC1200, XC900, XC1200, and virtual gateways. CTERA does not recommend setting up clientless backup.
Clientless backup enables you to back up files from any computer on your network to a share on the gateway, without requiring installation of a software agent on the remote computer.
Computers from which you back up must support Windows File Sharing (CIFS). It is also possible to configure a Mac to support clientless backup.
To make a Mac OS computer accessible to clientless backup:
1 On the Mac computer, in System Preferences > Sharing, make sure the File Sharing service is on and click Options.
2 Check Share files and folders using SMB and if necessary set up the account by entering the password for it.
3 Click Done.
To set up clientless backup, you need to configure the settings for clientless backup, such as the share on the gateway to which your computers will back up, and how many times per day clientless backup will be performed.
Next, you need to select the network shares you want to back up with clientless backup. These could be any folders on any computer on your network that are available for Windows File Sharing.
Because Clientless Backup uses Windows File Sharing, make sure any computer you want to back up from has file sharing enabled.
To enable file sharing:
1 Access Advanced sharing settings in the Network and Sharing Center.
Note: The name might be different for different Windows operating systems. In the control panel search for advanced sharing.
2 Make sure both network discovery and file and printer sharing are turned on.
If you are still having trouble, make sure Windows Firewall is not blocking file and printer sharing. Do the following:
1 Open Windows Firewall by clicking the Start > Control Panel, clicking Security, and then clicking Windows Firewall.
2 Click Allow a program through Windows Firewall.
To configure clientless backup:
1 In the CONFIGURATION tab, select Local Backup > Clientless Backup in the navigation pane.
The Clientless Backup page is displayed.
Note: Computers for which Clientless Backup is defined, but which are currently unavailable, appear in gray.
If your computer is missing in the list or is displayed in gray, see To enable file sharing:.
2 Click Configuration.
The Configure Clientless Backup window is displayed.
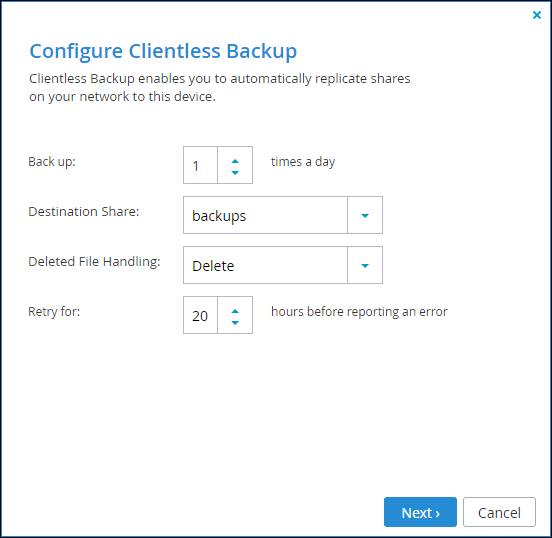
3 Configure the backup.
Back up – How many times a day the remote folders should be backed up.
Destination Share – The local gateway network share with which the remote folders should be backed up. Clientless Backup automatically creates subfolders under this network share for each backed up folder.
Deleted File Handling – How deleted files are handled.
Move to Trash Can – Files deleted in the source folder are moved from the destination folder to the Trash Can folder, called .Trash.
Delete – Files deleted in the source folder are permanently deleted from the destination folder.
Keep Deleted Files – Files deleted in the source folder are kept and not deleted in the destination folder.
Retry for – The number of hours after Clientless Backup has failed, that the gateway continues to retry Clientless Backup. The gateway only logs an error after the specified number of hours has elapsed.
4 Click Next and then click Finish.