Enabling CACHING Mode
Note: CACHING mode is not supported for C200 gateways.
To enable CACHING mode, you must ensure that at least one volume is formatted as XFS and that the cloud share is under this volume.
To enable CACHING mode:
1 In the CONFIGURATION tab, select Main > Home in the navigation pane, and then click Setup Wizard.
Note: If the gateway is not connected to a portal, the wizard starts by connecting to a portal.
The Select Gateway Mode window is displayed.
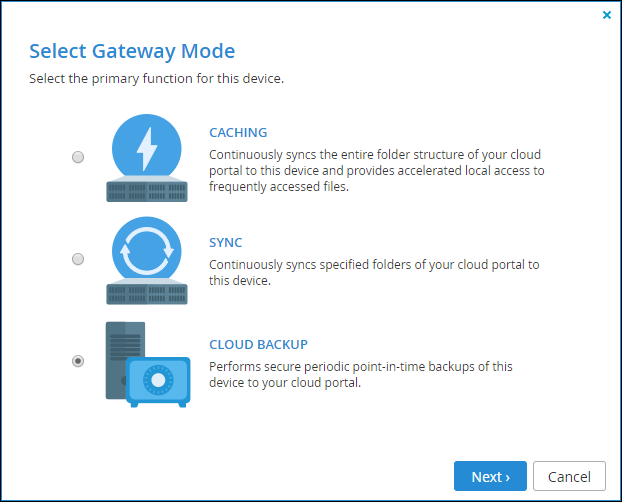
2 Select CACHING and click Next.
The Easy Storage Setup window is displayed.
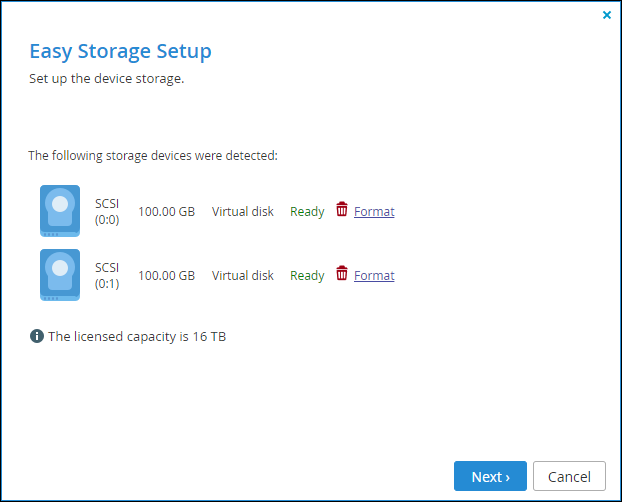
Note: When the gateway is a physical appliance, the license capacity is not displayed.
The available storage is displayed and you can remove this storage or format it, losing all data stored on the drive.
3 Click Next.
The Proposed Actions window is displayed. You can accept the proposals or skip them and manually define the arrays and volumes.
4 Click Skip or Next.
The Join and Active Directory Domain window is displayed. If your account is in an Microsoft Active Directory domain, you can specify the domain details.
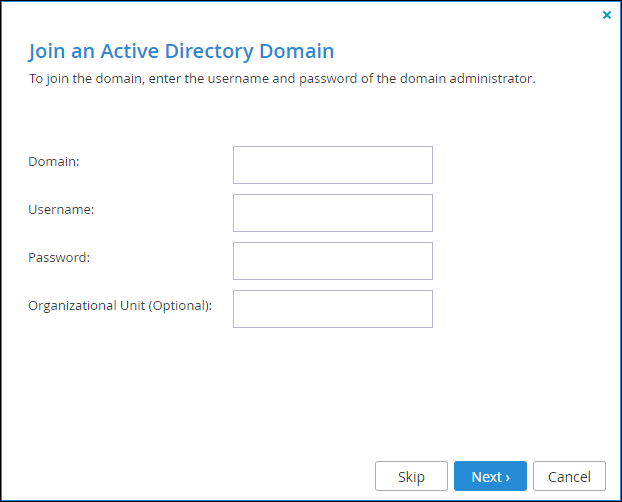
5 Click Skip or Next.
The Wizard Completed window is displayed.
6 Click Finish.
Folders and files that are stubs on the gateway are represented in Windows File Explorer by a gray X:
Note: When accessing the gateway from a Mac machine you need to following the procedure in Accessing a Caching Gateway From a Mac.
You can also enable CACHING mode as follows:
1 In the CONFIGURATION tab, select Cloud Drive > Cloud Drive in the navigation pane.
The Cloud Drive page is displayed. The following shows the Cloud Drive page when the gateway is set to Classic mode.
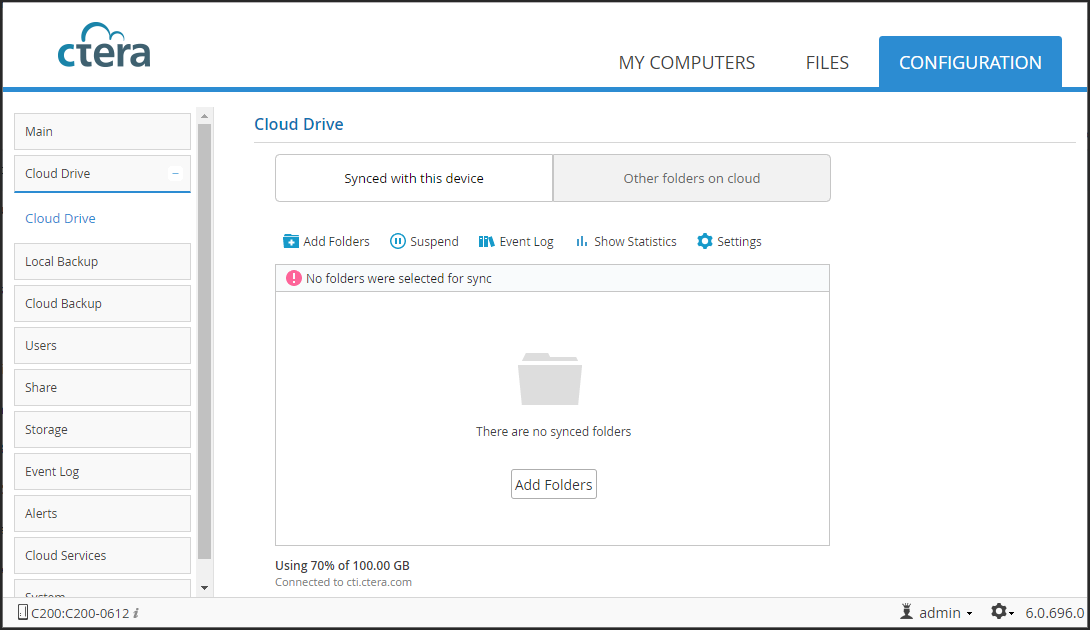
2 Click Settings.
The Cloud Drive Settings window is displayed.
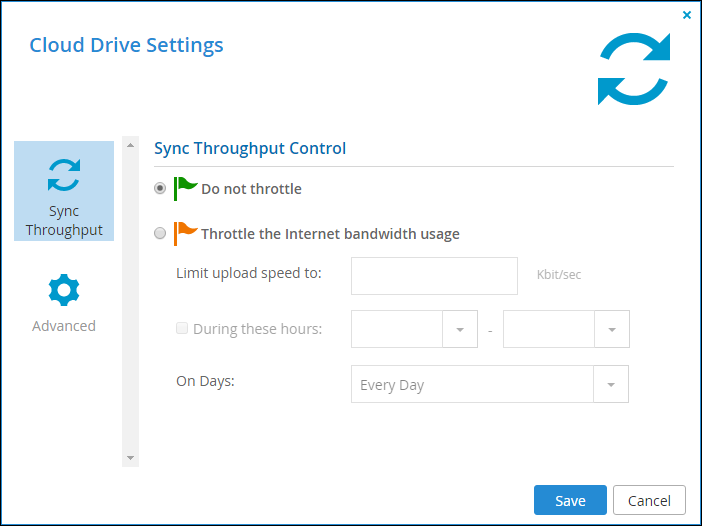
3 Select the Advanced option.

4 Set Operation Mode to Caching Gateway.
5 Click Save.
Accessing a Caching Gateway From a Mac
Before connecting to a gateway configured as a Caching Gateway, you have to configure the Mac so that icon previews and size details are not set and that hidden .DS_Store files are not enabled.
Note: Apple uses .DS_Store files to store the custom attributes of folders. By default, Finder creates a .DS_Store file in every folder that it accesses. Disabling the .DS_Store setting is required when connected to a Caching Gateway.
Also, when accessing Caching Gateway from a Mac, stub files have no indication in Finder that they are stubs.
To configure the Mac when connecting to a Caching Gateway:
1 Update your Mac OS X to macOS 10.14 (Mojave) or higher.
Note: You can check the version by right-clicking the Apple icon,  , in the right of the menu bar and choosing About This Mac to display the version. If required you can also update the software from this window.
, in the right of the menu bar and choosing About This Mac to display the version. If required you can also update the software from this window.2 Get the CTERACacheAssist app from CTERA support.
3 In Finder select Desktop and then choose View > Show View Options in the menu bar.
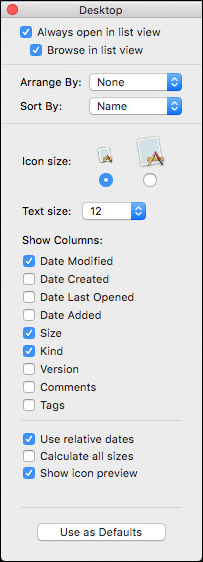
Note: The display can be different, dependent on your starting point.
4 Clear the Calculate all sizes and Show icon preview options. Depending on your Mac version, clearing Show icon preview also disables Calculate all sizes.
5 Click Use as Defaults and close the window.
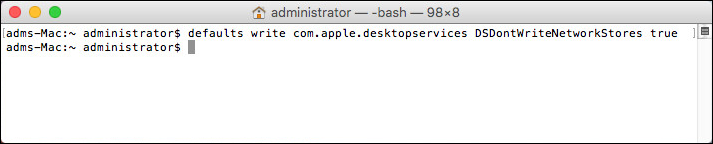
6 Open the Terminal application, located under Applications > Utilities.
7 Execute the following command:
defaults write com.apple.desktopservices DSDontWriteNetworkStores true
8 SMB signing within OSX is known to have a negative impact on network performance. With the SMB share mounted on the client machine, you can check if SMB signing is enabled by typing the following in the Terminal application: $ smbutil statshares -a
If SIGNING_ON = TRUE is returned, add the following to /etc/nsmb.conf:
[default]
signing_required=no
Note: nsmb.conf may not exist, it which case you need to be create it.
9 Restart the Mac.
File Eviction from the Caching Gateway
As the gateway storage space gets used up, the Caching Gateway starts to remove, evict, files leaving stubs on the gateway. Files start to be evicted only when the amount of storage used reaches the high watermark, 75% of the total gateway storage. At this point files are evicted until the amount of storage used is equal to, or less than, the low water mark, 65% of the total gateway storage.
The following hot files are never evicted, so they are always available at LAN speed:
Other hot files can be evicted. These files are grouped according to the time since they were last accessed. The files are evicted within these groups, the files in the oldest group first, followed by the files in the next oldest group.
Note: Eviction is based on days and not file size. Also, there is no differentiation within a group of the length of time since a file was accessed.
The eviction policy can be configured. For details, contact CTERA support.
The following graph shows expected disk space usage in a normal scenario.

If the available free space does become too small, throttling is implemented so that users can continue to write to their files, but the client's write speed is reduced to WAN speed so that the data being written is not faster than the data that is evicted to the cloud.
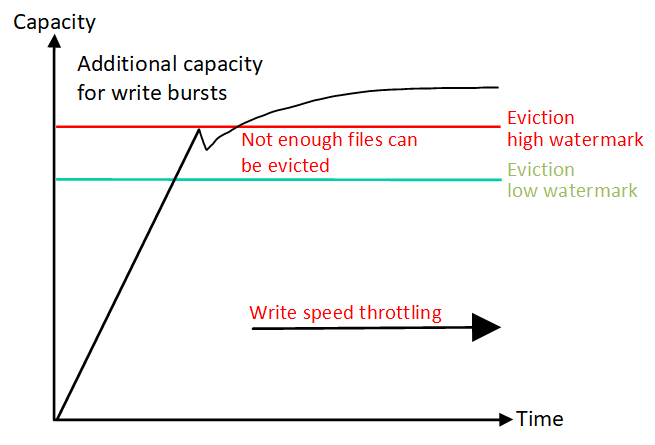
This type of scenario is not usual, except during a migration or a large amount of data or a very heavy write burst, using all the 25% storage space reserved for write bursts.
Pinning Folders so that Files are Always Available Locally in CACHING Mode
Files in pinned folders stay on the gateway and are never evicted. This is useful for files that you always want to be available, with immediate access, avoiding downloading these files over the Internet. This ensures that the folder is always accessible even when the Edge Filer is offline or if there is downtime of the cloud provider or portal.
The gateway supports many thousands of pinned folders.
Note: If the amount of data that you need to access locally can easily fit in a local appliance, it is recommended to pin all the data to provide the same levels of predictable performance and accessibility as a regular file server.
To pin files to be available locally in CACHING mode:
1 In the CONFIGURATION tab, select Cloud Drive > Pinned Folders in the navigation pane.
The Pinned Folders page is displayed.
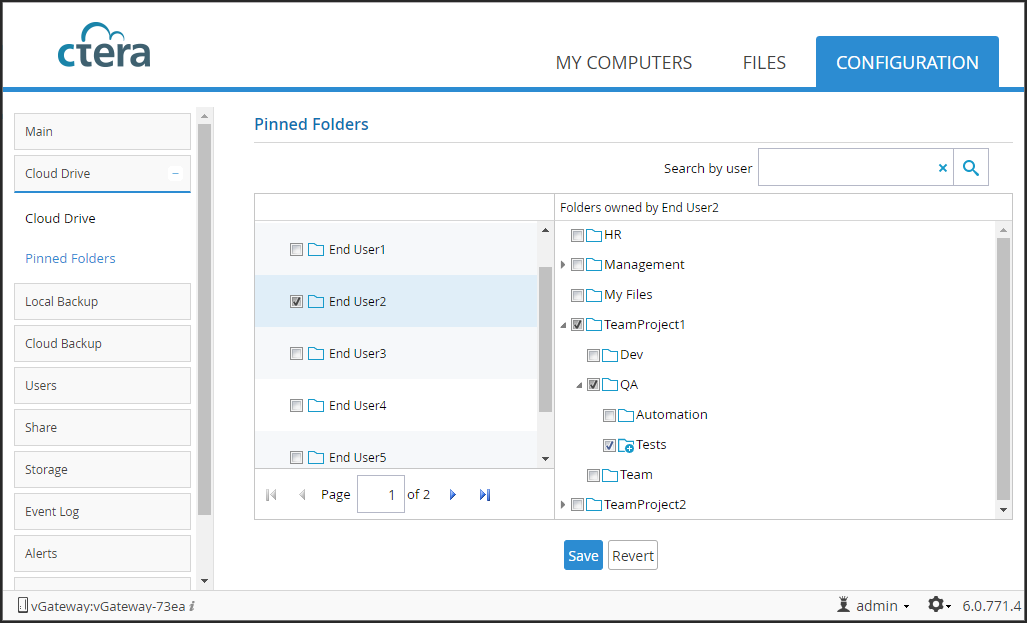
The Pinned Folders area is separated into a users pane and folders pane, with paging in the users pane. This makes it easier to page through the users and select the folders to pin.
2 Select a user to display the folders owned by the user and then select the folders that you want pinned for this user. In addition, you can use the search field to jump to a specific user.
Note: You can select a a user to select all the folders and subfolders owned by the user. You can also select a higher level folder to select all the subfolders under it and then uncheck specific folders to unpin them. If you check a cloud folder, all the subfolders under the cloud folder are pinned and any folders added later under the cloud folder will be pinned automatically.
3 Click Save.
The checked folders are pinned to the cloud share.
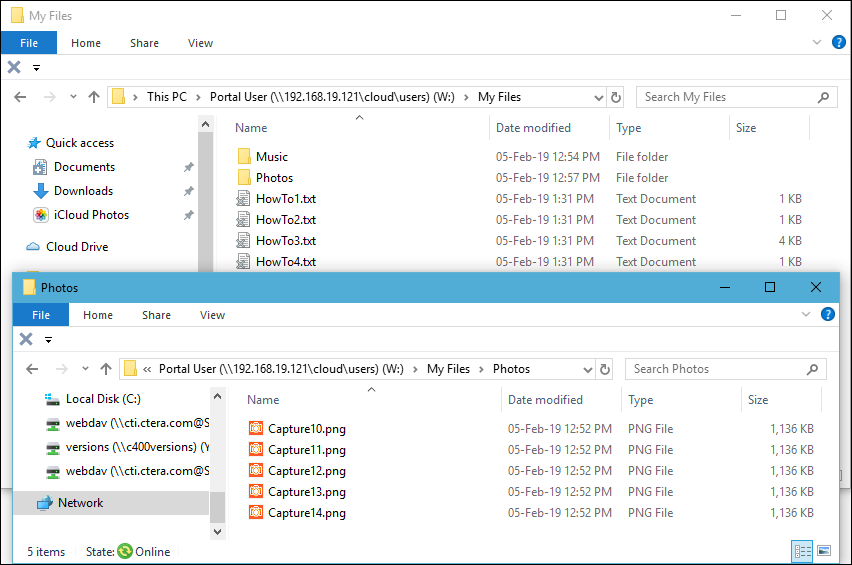
For example, after pinning Photos, shown in the screenshot in step 2, above, the files in Photos are downloaded from the portal but the files in My Files and Music remain as stubs:
Note: Windows ACL enabled folders on the portal cannot be synced unless the cloud share is defined as Windows ACL Emulation Mode, as described in Windows File Sharing.
What Happens to Files that are Not Pinned?
Files that are not pinned, are displayed in the gateway as stubs. When a user accesses a file stub, the file is opened by streaming from the cloud and in parallel, the file is added to a background download queue. As the gateway storage space gets used up, the Caching Gateway starts to remove, evict, files leaving only a stub on the gateway.
Note: When accessing the gateway from a Mac machine, stub files have no indication in Finder that they are stubs. Also, opening a folder with stub files, by default automatically downloads the files. To change the default behavior, so that stub files are not automatically downloaded when a folder is browsed, in the View menu, select Show View Options and uncheck Show icon preview.