Access – The Windows File Sharing access level. For more details, see Windows File Sharing.
Protocols – Protocols through which the share is exposed.
– RSync
– FTP
– CTERA Agent
– Search
Comment – Comments about the share. Fore example, Auto-generated if the share was created automatically.
Status – The status of the share:
Windows File Sharing
Windows files that you want to share via the gateway can be protected using one of the following access levels:
Only Authenticated Users
Users are required to authenticate using their gateway user name and password, in order to access the network share.
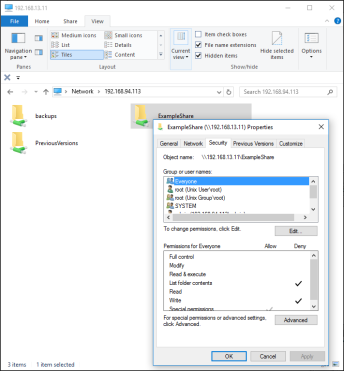
Windows ACL Emulation Mode
The share is a Windows ACL emulation mode share supporting a full Windows file system folder structure and permissions, including enforcement and settings, known as NT ACLs, and extended attributes such as read-only and hidden.
End users who are familiar with a given folder structure and shares, as well as a given permission scheme, while using the Windows file server, continue to see the same folder structure, shares, and permission scheme after migration to the gateway. This enables the migration from a current Windows Server-based file system to a CTERA gateway, without the need to apply any structural changes such as flattening the folder structure or simplifying the permissions scheme. The migration is entirely transparent to the end user.
Transition of the mapped network drives and share names available on the Windows client from the Windows file server location to the CTERA gateway location is performed seamlessly using AD GPO capabilities.
File and folder access continue to be available following the migration in the same way they were in the Windows Server-based file system. Access after the migration is through the SMB/CIFS access provided by the CTERA gateway.
Users continue to access the files and folders through standard Windows client computers; for example, using Windows Explorer. You can manage and change permissions by right-clicking a file or folder and selecting Properties and then the Security tab, just like over a Windows File server.
To set up shares in the gateway with NT ACL permissions, you need to do the following:

When Windows ACL emulation mode is defined, and the gateway is connected to a CTERA portal, to enable file syncing, the following options are available to users syncing to the shared files:
An agent connected to the portal has access to the cloud drive and is able to share any of the ACL folders and files with other users. These folders and files are accessible by the other users based on the ACLs defined. For example, even if a folder is shared with a user but the folder has no ACL access permissions, when the user attempts to access the folder a message similar to the following is displayed: You have no permission to view this folder. For details, refer to the CTERA Team Portal Administration Guide or CTERA Reseller Portal Administration Guide.
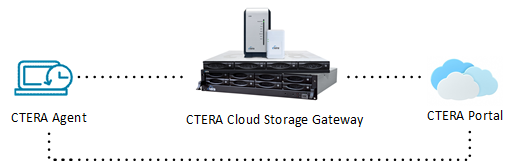
To set up the gateway to connect to a CTERA Portal with file syncing after the initialization described in the installation guide, see Setting Up Syncing.
Defining Network Shares
To define a network share:
1 In the CONFIGURATION tab, select Share > Shares in the navigation pane.
2 Click New Share.
The Select a Folder to Share wizard opens, displaying the volumes and folders on the gateway.
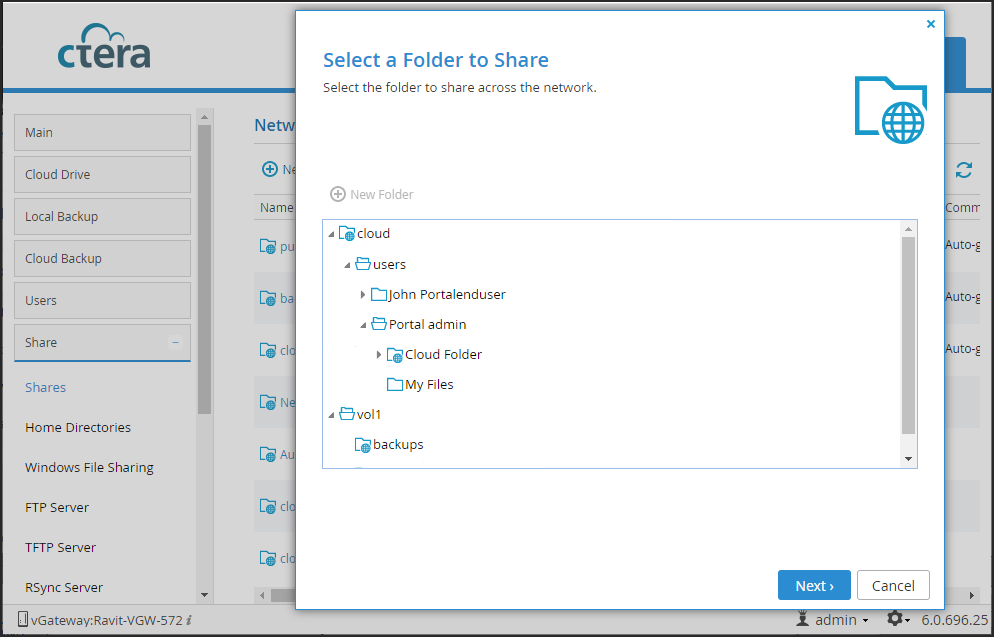
3 Select the volume, folder, or subfolder on which you want to define the share.
Note: Nested shares are not available for Cloud Backup. Instead, to back up the files, select them from the parent share.